Loper | Slate Documentation
Importing and Setting Up the Loper Suitcase in Slate
Updated December 10, 2025
Before reading these instructions
The documentation below provides Slate Captains and CRM Operators step-by-step instructions to use Loper’s Slate Suitcase to instantiate the source formats and prompt mappings required to leverage Loper’s behavioral data. To follow this documentation, ensure that you have Loper's Slate Suitcase ID or contact your account manager at Loper to acquire it.
In addition to this documentation, please schedule a conversation with Loper’s team to authenticate data into your SFTP by clicking on this calendar link:
Objective
This guide describes the complete process for importing and configuring the Loper suitcase in your Slate instance. It ensures that allcomponents are properly reviewed, imported, and activated for successful use.
Prerequisites
- Access to your institution’s Slate instance with admin privileges.
- The Loper-provided suitcase ID.
- Sample data files from Loper for final validation and mapping.
Step-by-Step Guide
1. Use the Suitcase ID to Import Suitcase
a. Loper will provide you the current Suitcase ID.
b. Navigate to the Database section in your production Slate instance. Search for Suitcase Import. Click on it.
c. Paste the suitcase ID into the text box.
d. Click Import.
e. Wait for the interstitial modal to display the suitcase’s contents.
Slate Documentation: Suitcase Import
2. Review and Select Items
a. Items Tab
- Review the items listed: Source Formats, Tabs, Forms, Queries.
- Uncheck any components you do NOT want to import.
- Optionally, use the New Name column to rename items to match your internal naming conventions.
- Optionally, use the Modify link to change settings for the new items like format, folder, or user.
- Review the Action column. There are four possible values in this dropdown.
-- Create New – if there is no matching item in your Slate instance, this will be the only available option.
-- If you already have this item in your Slate instance, you will have three different options:
--- Save as New Copy – leave the existing item alone and create a brand new copy.
--- Merge with Existing – update the existing item to match the suitcase version
--- Replace Existing – remove the existing item, replace it with the suitcase version.
Recommendation: Merge with Existing is usually the best option
b. Fields Tab
- Review the list of fields used by the items in this Suitcase.
- For each field, decide whether to use (and potentially create) the incoming custom field, remove references to the custom field, or update the Suitcase items to use a pre-existing field in your Slate instance.
-- If you do not have a field in your Slate instance that matches the incoming field id, the default option in the Mapping dropdown will be “< Import new Custom Field >”. Leave this selected if you want to create the new field.
-- If you already have a field in your Slate instance with the same field id, the default option in the Mapping dropdown will be “< Keep References >”. Leave this selected if you want to use the matching field.
-- If you want to remove all appearances of this field in the Suitcase items (and NOT create the field), select “< Clean references to this Custom Field >”
-- If you want to use a different pre-existing field in your Slate instance (for example, if you have a field for Loper ID that does not match the Suitcase version), you can select the field id of your pre-existing version in the Mapping dropdown. The Suitcase items will be updated to use your version of the field.
c. Prompts Tab
- Review the list of prompt keys used by this Suitcase.
- The default option in the Mapping column is“< Do not import >”.
-- If you want to create the default prompts from Loper that match incoming values, update the Mapping column to “< Import new prompts >”. This will create the new prompt key and prompt values in your Slate instance.
-- If you already have a matching prompt key in your Slate instance, you will have an option for “< Merge with existing prompts >”. This will update your existing prompt list to match the Suitcase version.
-- If you do not want to import a prompt key, leave the “< Do not import >” option selected.
- If you have an existing prompt list that you want to use instead of the Suitcase version, change the Mapping column selection to the prompt key for your existing prompts. The Suitcase items will be updated to use the prompt key you select.
Important Note
– There are five prompt keys with values specific to your institution: loper_wizquiz_badge, loper_dayinthelife_badge, loper_factorfiction_badge, loper_campaign_tags, and loper_campaign_clicks. When you import these three prompt keys from the Suitcase, you will get placeholder prompt values (Badge 1, Badge 2, Campaign Tag 1, Campaign Tag 2, etc.). Update these prompt values after import to match your actual Badge and Campaign values as provided by Loper.
d. Rules of Thumb
- If you are new to importing Loper data and setting this up for the first time
-- Items Tab: Action = Create New
-- Fields Tab: Mapping = < Import new Custom Field >
-- Prompts Tab: Mapping = < Import new prompts>
- If you are already importing Loper data using an older version of this Suitcase:
-- Items Tab: Action = Merge with Existing
-- Fields Tab:
--- For existing fields: Mapping = < Keep references >
--- For new fields: Mapping = < Import new Custom Field >
-- Prompts Tab:
--- For existing prompts: Mapping = < Merge with existing prompts >
--- For new prompts: Mapping = < Import new prompts >
- If you are already importing Loper data using custom source formats and fields
-- Items Tab: Review each item and decide whether to replace your existing resources with new standardized copies (recommended)
-- Fields Tab: Review each item and decide whether to remap the incoming field to a pre-existing version in your instance.
-- Prompts Tab: Review each item and decide whether to remap the incoming prompts to an pre-existing prompt key in your instance.
e. Import All Items
- Once satisfied with the selections and configurations, click Import. Slate will now create the selected items.
3. Refresh System Caches
a. Refresh the Fields Cache
- Go to Database > Fields and force refresh the cache. This will let you use the newly created fields in your Source Formats and Forms.
b. Update Custom Prompts
- Go to Database > Prompts
- Find the loper_wizquiz_badge prompt key. Click on it to review the values. By default, the suitcase creates Badge 1, Badge 2, Badge 3, and Badge 4.
- Update these values according to the custom prompts spreadsheet Loper provided you.
- Repeat this process with loper_dayinthelife_badge, loper_factorfiction_badge, loper_campaign_tags and loper_campaign_clicks.
c. Refresh the Prompts Cache
- Stay in Database > Prompts and force refresh the cache. This will let you use the newly created prompts in your Source Formats and Forms.
d. Refresh the Configurable Joins Library.
- Go to Database > Refresh Configurable Joins Library. This will rebuild the exports, filters, and joins in your Slate instance so that you can build queries and reports using the newly created items.
4. Setting Up the Source Formats
Complete this process for each Source Format. The general process will be to configure the source format in your production Slate environment, test the source format in your test environment, and after validating your configurations, activate the flow of data in production.
a. Activate the Source Formats
- Navigate to Database > Source Formats.
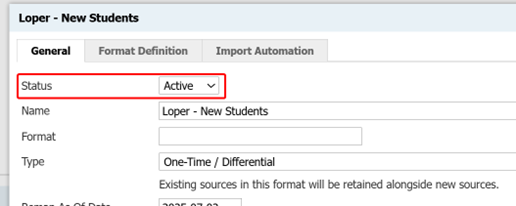
- Locate the first Loper source format. Click on it.
- Click Edit (top right corner).
- Set the Status to Active. (Leave Remap Active set to Inactive).
b. Check and update the mappings
- Upload a Loper sample file with representative data to the active source format.
- Wait 10–15 minutes for it to process (or use the Force Process Import option in the Database section for quicker results).
- On the Source Format, click “Edit Mappings”
- Review the Field Mappings, Prompt Value Mappings, and Static Mappings. Standard Loper fields and prompts have been mapped for you.
- Add or edit field and prompt mappings as you see fit.
c. Test your mappings
- As a best practice, when you have completed your field and prompt mappings, refresh your test environment.
- In the newly refreshed test environment, activate your mappings by changing the Remap Active status to Active.
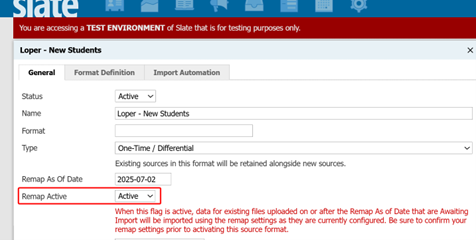
- This setting will allow the import of data into your Test Environment. When the import completes, review the created and updated records for accuracy.
- If you need to change any mappings, make the changes in your production Slate instance, then repeat the Test environment refresh and import testing.
d. Activate Mappings
- When your Source Format is mapped in Production and you have completed your testing, update the Remap Active flag in Production.
- Data will begin flowing automatically.
